About Wall Decor's Decorating Tips & Tricks
Removing newer wallpaper or wall murals is normally pretty simple. The majority of newer products are either pre-pasted or self adhesive and simply peel off the wall. Once removed you simply need to clean your wall with water and soap to remove any residue.
On the other hand, older wallpapers or special wall coverings require and adhesive paste to be applied and require more work to remove. So, how do you remove wallpaper without damaging your wall and leaving yourself the least amount of cleanup? There are actually several methods that include; hot water, chemicals, steaming or hiring a professional. If you simply do not have the time to do it yourself or are not very patient you may want to utilize the last method and hire a professional to perform the job. You should actually do some investigating to determine:
- Was the wall sealed with a primer prior to wallpaper being installed?
- Was the wallpaper installed over another wallpaper?
- Is the wallpaper an actual paper of vinyl material?
To make this determination you should either start peeling back the paper at one of the wall/ceiling corners or remove a switch wall plate and peel back the wallpaper.
If you are a true DIY'er you will want to use one of the other three methods listed. Hot water is safe, however may take a great deal of time to soften the paste for removal, and too much water can actually damage drywall. Steaming used to be a popular method, but also takes a great deal of time and comes with the possibility of scalding yourself or even damaging drywall or cracking plaster.
After eliminating water and steam, and deciding to do the job yourself, this leaves the chemical method for removal. Chemical alternatives include strippers that are premixed or can be purchased as powders or gels. The steps below will utilize this chemical method as it is the most popular and easiest, but still requires time and patience. To strip one room you should set aside an entire weekend and be prepared to repeat several steps along the way:
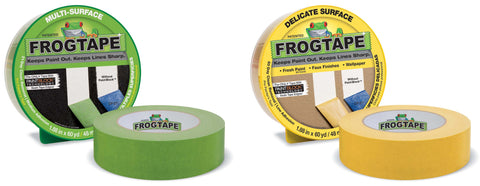
- Painters Tape (we recommend Frog Tape)
- Painters plastic sheeting
- Painters canvas drop clothes
- Elbow length rubber gloves
- Large plastic trash bags
- Several sponges
- Two buckets
- Metal paint scraper - not a putty knife
- SimpleStrip wallpaper removal system (includes all tools and supplies required and can be purchased here SimpleSafe System)
Preparation
- Removing wallpaper is extremely messy so preparation is extremely important. First, remove all furniture from the room. This will ensure no paste gets on the furniture and you will need the space to work.
- Remove all switch and receptacle covers on any of the walls. Turn off electricity to the room and use work lamps on extension cords to light the area. You will want to place the work lights in the center of the room so they are our of your way.
- Continue by using the painters tape to apply plastic along all baseboards. Ensure the plastic extends, at least, 24" from the baseboards onto the floor. Once complete use a putty knife to run along the tape to seal it and keep any water and paste from seeping between the tape and baseboard.
- To complete prep lay down canvas drop clothes on the floor up to the edge of the baseboard. Be sure to have the canvas overlap on top of the plastic on the floor.
- Fill one of the buckets with hot water and the second with water and the SimpleStrip Power Solution. Follow the directions for amount of solution to add to water.
Removing Wallpaper
- Utilize the SimpleStrp system and tools as described in their instructions. Be sure you are wearing the gloves during this phase and also always place the removed wallpaper in the trash bags once removed. You do not want to step onto a wet, sticky mess on the floor in the middle of working.
- Step 1 may need to be repeated several times in certain areas to soften and dissolve the paste.
- Once all wallpaper has been removed you need to remove all remaining past completely from the walls. You may do this by using the SimpleStrip Power Solution in conjunction with the metal paint scraper.
- After you have removed all of the paste the walls will need to be wiped down with a sponge and hot water. The sponge should slightly wet to wipe the walls down, but not too wet as it may damage the drywall.
Cleanup
- While the walls are drying this is a great time to clean up.
- You may want to double bag the trash bags with the wallpaper since the outside of the bags are probably wet and sticky. This ensures if the bags rub against anything on the way outside to the trash you will not have a mess.
- Cleanup buckets and sponges.
- You may want to leave the plastic covered baseboards alone if you intend to paint later.
- Let the walls dry for 24 hours prior to repairing, painting or installing new wallpaper. Depending upon what you plans our you can review any of our other articles.
This first step may be the most important for installing wallpaper or wall murals. Neither product will adhere to dirty surfaces, old wallpaper or paint. Following are some simple steps to take to ensure your walls are prepped for not only installing, but will also assist in removal when desired. Your ultimate goal is to repair and level the surface then apply a coat of high quality acrylic sealer and primer, thereby providing a stable and strong surface for for wallcoverings to slide onto and adhere.
Following these steps to prepare you wall when removing old wallpaper:
- If your wall surface has old wallpaper it must be removed. Follow the steps in our article Removing Wallpaper.
- Next, you will need to repair any holes or uneven surfaces by following the recommendations in our tips and tricks article Repairing Walls After Removing Old Wallpaper.
Follow the below steps for walls with peeling or flaking paint, or were the paint was applied more than 8 years ago:
- Use our article called Preparing Peeling or Flaking Wall Surfaces for Paint.
Once your walls are completely repaired ad level you are prepared to apply a hi-quality acrylic primer to the surface. Here are some steps for applying the primer:
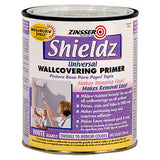
- Select your primer. We recommend a hi-quality product like Zinsser's (recently purchased by Rust-Oleum) Shieldz primer/sealer. This is a one coat product that can be tinted and also offers the addition of mild and mildew resistance. It can be purchased at nearly any hardware store and costs around $72/gallon. If this seems expensive you have to remember this is a primer and sealer that offers mold and mildew resistance. There are cheaper alternatives for around $50/gallon, however the majority are only primers and do not seal or offer mild and mildew resistance.
- Wipe the wall down with a damp rag or sponge. Be sure to rinse the rag.sponge often to ensure all dirt and dust particles are rinsed.
- Once you wall dries, we recommend waiting for 24 hours before applying primer.
- Remove all switches and receptacle wall plates.
- Tape off the wall area with a quality painters tape. We recommend Frog Tape, that again, can be purchased at nearly any hardware store and there are two different types; green for multiple surfaces and yellow for delicate. You will more than likely utilize the multi-surface tape.
- Prior to applying the primer use a putty knife to run along the tape edges to ensure it seals and adheres so you will not encounter any wicking (paint getting under edges of tape). You can read our article that covers this step in more depth in our article How to Properly Tape an Area for Painting.
- See our articles for Selecting a Proper Brush or Roller for Applying Primer or Paint.
- Once you are ready to start applying the primer read our article about How to Properly Paint a Wall.
- Once completed refer to the primer manufacturers directions for drying/curing time prior to installing your wallcovering.
- Read our article for Installing Wallpaper or Wall Murals to complete the job.


Sign up to get the latest on sales, new releases and more …

© 2026 About Wall Decor.
2006-2015 SerKlin Enterprises, Inc. All Rights Reserved.
Powered by Shopify